


News Detail
How to Repair Worn Edges on a Welding Table: Correct Grinding and Weld Restoration Steps
author:hxrtools Time:2025-08-05 18:30:20 Click:90
Protecting the Edges of Your Welding Table
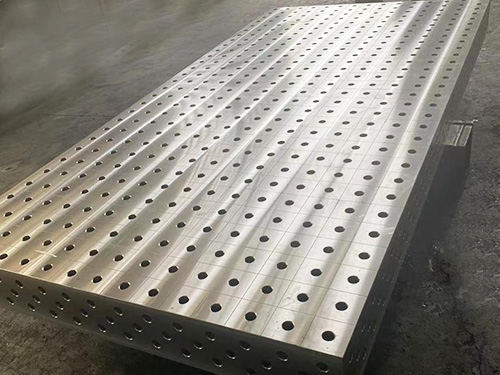
In any workshop that relies on precision welding, the welding table is more than just a flat surface—it's the heart of accuracy, clamping, and alignment. However, frequent use, dropped tools, and high-temperature operations can cause the edges and corners of your welding table to wear down, become rounded, or even chipped.
Worn edges not only affect aesthetic value but also compromise workholding precision and table integrity. In this article, we explore the most effective steps to restore worn or damaged welding table edges, including grinding, welding, and finishing techniques, along with practical tips for prevention.
1. Why Welding Table Edges Wear Out Over Time
1.1. Repeated Impact and Abrasion
Dropping tools, sliding heavy components, or grinding too close to the table edge can gradually erode sharp corners and cause surface pitting.
1.2. Thermal Fatigue
Exposing the table edge to frequent welding arcs and spatter can weaken the metal over time, leading to cracking or delamination.
1.3. Clamping Pressure
Aggressive clamping at the edges, especially without soft pads, may deform or dent corners, especially on thinner gauge steel tables.
2. Tools and Materials You’ll Need
To repair the edges of a welding table, prepare the following:
·Angle grinder with flap disc or grinding wheel (60–120 grit)
·Welding machine (MIG or TIG, depending on table material)
·Filler wire compatible with the table steel (e.g., ER70S-6 for mild steel)
·Straight edge or machinist square
·Magnetic clamps or edge guides
·Wire brush / die grinder
·Heat-resistant paint or anti-rust coating
3. Step-by-Step: How to Restore Worn Welding Table Edges
Step 1: Clean and Inspect the Edge
Use a wire brush or angle grinder to remove rust, oil, slag, and debris. Check for cracks, deep pits, or signs of thermal fatigue.
Step 2: Grind Damaged Sections
Grind away rough or jagged sections of the worn edge. If necessary, use a square to realign and smooth the edge geometry. Remove only as much material as needed to reveal a clean base.
Tip: Use a magnetic square to maintain 90° edges when grinding.
Step 3: Weld the Edge Back (if material is lost)
For edges with deep erosion or missing sections, use a multi-pass weld buildup technique:
·Use short beads to prevent excessive heat input.
·Allow brief cooling between passes to minimize distortion.
·Feather each weld layer with light grinding before the next pass.
Step 4: Re-Grind and Reshape
After welding, use your grinder to shape the edge back to a square profile. Ensure flush transition with surrounding surfaces and corners.
Step 5: Apply Finish or Protection Layer
Apply a heat-resistant paint, bluing agent, or anti-rust spray to the repaired edge. This prevents future corrosion and gives a cleaner finish.
4. How to Test Flatness and Edge Alignment
Once repaired, verify the edge and corner with:
·Machinist square: Check 90° accuracy along corners.
·Straightedge and feeler gauge: Look for gaps along edge length.
·Visual test with clamping tool: See if clamps sit evenly.
5. Preventive Tips to Avoid Future Edge Wear
Use Edge Guards or Beveled Protectors
Install removable steel or aluminum edge strips that absorb tool impact without damaging the table body.
Clamp with Soft Pads
Place leather or silicone pads under clamps near edges to avoid bite marks and indentation.
Avoid Arc Strikes on Edges
Train welders to strike arcs away from the edge to reduce thermal fatigue and cracking risk.
Allow Cooling Periods
After prolonged welding near the edges, let the table cool gradually to avoid micro-fractures due to rapid temperature change.
Bonus: Best Edge-Friendly Welding Table Features
| Feature | Benefit |
|---|---|
| Flame-hardened steel edges | Resist chipping and arc damage |
| Replaceable modular border plates | Easy repair without disturbing entire surface |
| Chamfered or rounded edge profile | Reduces impact stress during loading/unloading |
Conclusion: Don’t Let Edge Damage Undermine Your Welding Precision
A welding table with worn or deformed edges not only compromises work accuracy but also reduces the service life of your fixture. With the right grinding tools, weld techniques, and finishing process, you can restore even heavily worn corners to a near-new state.
By combining regular inspection with smart preventive measures, your welding table will remain square, stable, and reliable for years to come—regardless of the intensity of your projects.
Invest in proper maintenance today—because every great weld begins on a strong edge.
References
GB/T 7714:DebRoy T, Wei H L, Zuback J S, et al. Additive manufacturing of metallic components–process, structure and properties[J]. Progress in materials science, 2018, 92: 112-224.
MLA:DebRoy, Tarasankar, et al. "Additive manufacturing of metallic components–process, structure and properties." Progress in materials science 92 (2018): 112-224.
APA:DebRoy, T., Wei, H. L., Zuback, J. S., Mukherjee, T., Elmer, J. W., Milewski, J. O., ... & Zhang, W. (2018). Additive manufacturing of metallic components–process, structure and properties. Progress in materials science, 92, 112-224.
 HOT PRODUCTS

 CONTACT US
—— E-mail:project@haoranmj.com
—— Whatsapp:+86 18932785670
—— Tel:+86 18932785670
—— Add:Across from Sanjing Distillery on Road 4, Botou Economic Development Zone, Cangzhou City, Hebei Province